更新程序
Tauri 为 NSIS (Windows)、MSI (Windows)、AppImage (Linux) 和 App bundle (macOS) 分发格式提供了内置的更新程序。
Tauri 项目准备就绪后,您可以配置 Tauri 的更新程序,为您的用户启用自动更新。
签名更新
Tauri 的更新程序具有内置的签名机制,以确保更新的安全安装。
要对更新进行签名,您需要两样东西:
- 公钥,稍后将添加到您的
tauri.conf.json文件中,用于在安装之前验证更新工件。 - 私钥,用于对更新工件进行签名,切勿与任何人共享。此外,如果您丢失此密钥,将无法向当前用户群发布新更新。务必将其存储在安全的地方,以便随时访问。
要在 Linux 和 macOS 上生成密钥,您可以使用 Tauri CLI:
- npm
- Yarn
- pnpm
- bun
- Cargo
npm run tauri signer generate -- -w ~/.tauri/myapp.key
yarn tauri signer generate -w ~/.tauri/myapp.key
pnpm tauri signer generate -w ~/.tauri/myapp.key
bunx tauri signer generate -w ~/.tauri/myapp.key
cargo tauri signer generate -w ~/.tauri/myapp.key
如果您使用的是 Windows,则应使用 $HOME/.tauri/myapp.key 或您选择的其他路径。
- npm
- Yarn
- pnpm
- bun
- Cargo
npm run tauri signer generate -- -w $HOME/.tauri/myapp.key
yarn tauri signer generate -w $HOME/.tauri/myapp.key
pnpm tauri signer generate -w $HOME/.tauri/myapp.key
bunx tauri signer generate -w $HOME/.tauri/myapp.key
cargo tauri signer generate -w $HOME/.tauri/myapp.key
Tauri 配置
现在,您需要配置 Tauri 的更新程序。为此,请将以下内容添加到您的 Tauri 配置 中:
{
  "tauri": {
    "updater": {
      "active": true,
      "endpoints": [
        "https://releases.myapp.com/{{target}}/{{arch}}/{{current_version}}"
      ],
      "dialog": true,
      "pubkey": "YOUR_UPDATER_SIGNATURE_PUBKEY_HERE"
    }
  }
}
要启用更新程序,所需的密钥是 "active"、"endpoints" 和 "pubkey"。"dialog" 是可选的,如果未设置,则默认为 true。
"active" 必须是布尔值。默认设置为 false。
"endpoints" 必须是更新程序端点 URL 的字符串数组。在生产模式下强制执行 TLS。
每个更新程序 URL 可以包含以下变量,允许您在服务器端确定是否有可用的更新:
{{current_version}}:请求更新的应用程序的版本。{{target}}:操作系统名称 (linux、windows或darwin之一)。{{arch}}:机器的架构 (x86_64、i686、aarch64或armv7之一)。
"pubkey" 必须是使用 Tauri 的 CLI 以上生成的有效公钥。
如果存在 "dialog",则必须是布尔值。默认设置为 true。如果启用,则更新程序事件将被禁用,因为内置对话框处理所有内容。如果您需要自定义事件,则必须关闭内置对话框。
Windows 上的 installMode
在 Windows 上,还有一个可选的配置 "installMode" 用于更改更新的安装方式。
{
  "tauri": {
    "updater": {
      "windows": {
        "installMode": "passive"
      }
    }
  }
}
"passive":将显示一个带有进度条的小窗口。更新将安装,无需任何用户交互。通常推荐使用,也是默认模式。"basicUi":将显示一个基本的用户界面,需要用户交互才能完成安装。"quiet":不会向用户提供任何进度反馈。在此模式下,安装程序无法自行请求管理员权限,因此它仅适用于用户范围的安装或您的应用程序本身已以管理员权限运行的情况。通常不推荐使用。
更新工件
正确配置和启用更新程序后,Tauri 的捆绑程序将自动生成和签名更新工件。
在构建应用程序之前,您需要为私钥和密码设置环境变量:
TAURI_PRIVATE_KEY:私钥的路径或内容。TAURI_KEY_PASSWORD:您的私钥密码(可选)。
如果您想为当前控制台会话设置这些变量,您可以在稍后用于构建应用程序的控制台中执行以下命令:
- Bash
- PowerShell
export TAURI_PRIVATE_KEY="content of the generated key"
export TAURI_KEY_PASSWORD="password"
$env:TAURI_PRIVATE_KEY="content of the generated key"
$env:TAURI_KEY_PASSWORD="password"
之后,您可以像往常一样运行 tauri build,Tauri 将生成更新包及其签名。
Linux:在 Linux 上,Tauri 将从
target/release/bundle/appimage/文件夹内的 AppImage 创建一个.tar.gz存档:myapp.AppImage- 标准应用程序包。myapp.AppImage.tar.gz- 更新程序包。myapp.AppImage.tar.gz.sig- 更新程序包的签名。
macOS:在 macOS 上,Tauri 将从
target/release/bundle/macos/文件夹内的应用程序包创建一个.tar.gz存档:myapp.app- 标准应用程序包。myapp.app.tar.gz- 更新程序包。myapp.app.tar.gz.sig- 更新程序包的签名。
Windows:在 Windows 上,Tauri 将从
target/release/bundle/msi/和target/release/bundle/nsis文件夹内的 MSI 和 NSIS 安装程序创建.zip存档:myapp-setup.exe- 标准应用程序包。myapp-setup.nsis.zip- 更新程序包。myapp-setup.nsis.zip.sig- 更新程序包的签名。myapp.msi- 标准应用程序包。myapp.msi.zip- 更新程序包。myapp.msi.zip.sig- 更新程序包的签名。
只要您的私钥安全,就可以安全地上传和共享签名。
服务器支持
Tauri 的更新程序支持两种发布更新数据的方式:
- 静态 JSON 文件(用于 S3 或 GitHub gist 等服务)
- 动态更新服务器
静态 JSON 文件更易于使用,而动态更新服务器将使您能够更好地控制更新机制。
静态 JSON 文件
使用此方法,Tauri 将始终请求相同的 JSON 文件,并通过将响应的版本字段与请求应用程序的当前版本进行比较来确定应用程序是否需要更新。Tauri 将期望以下格式的响应:
{
  "version": "v1.0.0",
  "notes": "Test version",
  "pub_date": "2020-06-22T19:25:57Z",
  "platforms": {
    "darwin-x86_64": {
      "signature": "Content of app.tar.gz.sig",
      "url": "https://github.com/username/reponame/releases/download/v1.0.0/app-x86_64.app.tar.gz"
    },
    "darwin-aarch64": {
      "signature": "Content of app.tar.gz.sig",
      "url": "https://github.com/username/reponame/releases/download/v1.0.0/app-aarch64.app.tar.gz"
    },
    "linux-x86_64": {
      "signature": "Content of app.AppImage.tar.gz.sig",
      "url": "https://github.com/username/reponame/releases/download/v1.0.0/app-amd64.AppImage.tar.gz"
    },
    "windows-x86_64": {
      "signature": "Content of app-setup.nsis.sig or app.msi.sig, depending on the chosen format",
      "url": "https://github.com/username/reponame/releases/download/v1.0.0/app-x64-setup.nsis.zip"
    }
  }
}
所需的密钥是 "version"、"platforms.[target].url" 和 "platforms.[target].signature";其他密钥是可选的。
"version"必须是有效的 semver 版本号,可以带或不带前导v,这意味着1.0.0和v1.0.0都是有效的。"platforms":每个平台密钥均采用OS-ARCH格式,其中OS为linux、darwin或windows之一,ARCH为x86_64、aarch64、i686或armv7之一。"url"必须是更新包的有效 URL。"signature"必须是生成的.sig文件的内容。每次运行tauri build时,签名都可能会更改,因此请确保始终更新它。"notes":您可以在此处添加有关更新的说明,例如发行说明。Tauri 的默认对话框会在询问是否允许更新时将其显示给用户。- 如果存在
"pub_date",则必须根据 RFC 3339 进行格式化。
请注意,Tauri 将在检查版本字段之前验证整个文件,因此请确保所有现有的平台配置都是有效且完整的。
Tauri Action 会生成一个静态 JSON 文件,供您在 GitHub Releases 等 CDN 上使用。
动态更新服务器
使用此方法,Tauri 将遵循更新服务器的指令。要禁用内部版本检查,您可以覆盖 Tauri 的版本比较,始终安装服务器发送的版本。如果您需要快速回滚应用程序版本,这将非常有用。
您的服务器可以使用上面endpoint url 中定义的变量来确定是否需要更新。如果您需要更多数据,可以在 Rust 中添加额外的请求头。
如果没有任何可用的更新,您的服务器应返回 204 No Content 状态代码。
如果需要更新,您的服务器应返回 200 OK 状态代码以及此格式的 JSON 响应:
{
  "version": "0.2.0",
  "pub_date": "2020-09-18T12:29:53+01:00",
  "url": "https://mycompany.example.com/myapp/releases/myrelease.tar.gz",
  "signature": "Content of the relevant .sig file",
  "notes": "These are some release notes"
}
所需的密钥是 "url"、"version" 和 "signature";其他密钥是可选的。
"version"必须是有效的 semver 版本号,可以带或不带前导v,这意味着1.0.0和v1.0.0都是有效的。"url"必须是更新包的有效 URL。"signature"必须是生成的.sig文件的内容。每次运行tauri build时,签名都可能会更改,因此请确保始终更新它。"notes":您可以在此处添加有关更新的说明,例如发行说明。Tauri 的默认对话框会在询问是否允许更新时将其显示给用户。- 如果存在
"pub_date",则必须根据 RFC 3339 进行格式化。
CrabNebula,Tauri 的官方合作伙伴,提供动态更新服务器。有关更多信息,请参阅 使用 CrabNebula 云分发 文档。
检查更新
内置对话框
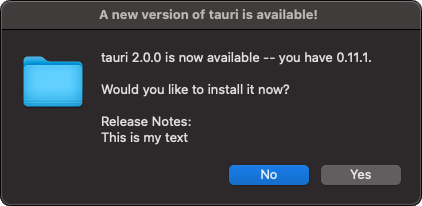
默认情况下,更新程序内部使用 Tauri 的 dialog.ask API 显示一个对话框。该对话框只有在应用程序刚启动或手动 emit "tauri://update" 事件时才会检查新更新。

对话框的发布说明由 服务器 提供的更新 `notes` 表示。如果用户接受,则下载并安装更新。之后,系统会提示用户重新启动应用程序。
自定义对话框
您需要在 Tauri 配置 中禁用内置对话框才能启用 JavaScript API 和更新程序事件!
Rust
有关 Rust API,请参阅 docs.rs 上的更新程序模块文档。
JavaScript
完整的 API 文档请参见 此处。使用 JavaScript API 的示例如下所示
import {
  checkUpdate,
  installUpdate,
  onUpdaterEvent,
} from '@tauri-apps/api/updater'
import { relaunch } from '@tauri-apps/api/process'

const unlisten = await onUpdaterEvent(({ error, status }) => {
  // This will log all updater events, including status updates and errors.
  console.log('Updater event', error, status)
})

try {
  const { shouldUpdate, manifest } = await checkUpdate()

  if (shouldUpdate) {
    // You could show a dialog asking the user if they want to install the update here.
    console.log(
      `Installing update ${manifest?.version}, ${manifest?.date}, ${manifest?.body}`
    )

    // Install the update. This will also restart the app on Windows!
    await installUpdate()

    // On macOS and Linux you will need to restart the app manually.
    // You could use this step to display another confirmation dialog.
    await relaunch()
  }
} catch (error) {
  console.error(error)
}

// you need to call unlisten if your handler goes out of scope, for example if the component is unmounted.
unlisten()